
One thing the CoCo community has needed for some time is a viable way to repair or replace the keyboards in our aging machines.
The original CoCo keyboard is a membrane type internally, with the circuit printed on mylar. Many of these mylars are wearing out today, and the conductor tends to develop cracks in the section connecting to the motherboard.
In the recent past, there has been talk of having a run of replacement mylars made, with a couple of individuals going as far as to get quotes. Though an option, prices seem to be expensive enough that to date this has not happened.
Cloud9 has developed a solution that involves a very thin PCB with tactile switches being used to replace the mylar in original keyboard casings which looks like a good option.
Having wanted to make a keyboard replacement myself for quite some time, I decided to throw my hat into the ring with my own design. I had a couple of criteria for the final keyboard.
- It had to use standard modern key switches of the current de facto standard
- It had to be a drop-in replacement
Later models of the CoCo1, as well as CoCo 2 models and the CoCo3, can all accommodate the same design. These are models I’ve targeted.
One of the major obstacles to a new keyboard for the CoCo is that like most early computers, the legends on the keycaps are not laid out as they are in what has become the standard layout over the years. This means that new keycaps that will fit modern key switches cannot be purchased with pre-labeled keys. Blank keycap sets are available, but then there is the issue of labeling them in a professional fashion.
Of course there are companies that will produce custom keycap sets for you, but prices and minimum quantities are high, and any change in design would be very expensive.
One of the ways manufacturers label keys is using lasers. After investigating this a bit, I decided that would be a good way for me to go. Owning the laser system myself would allow me a great deal of flexibility as well, enabling me to put nearly anything on nearly any keycap at a whim.
So I purchased a 20w fiber laser system for the purpose (and for other things).

20w fiber laser system
The system is quite flexible, and does the keycaps with ease.

Laser marked keys, an early test
Keycap marking with the laser
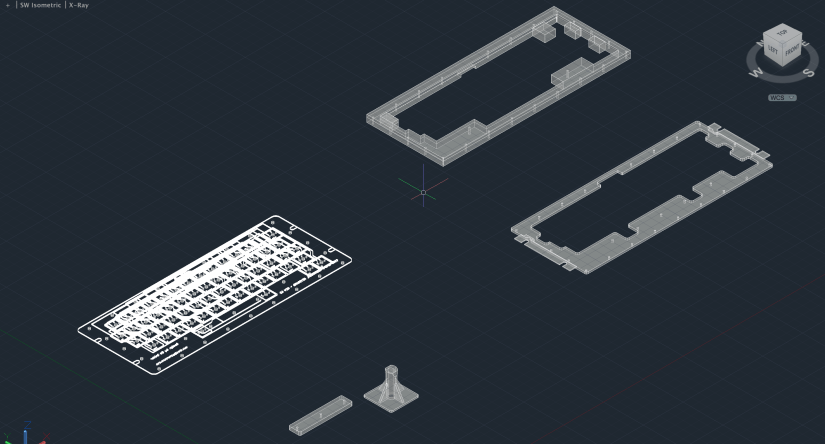
With a solution for the keys decided on, I moved on to the rest of the design. To avoid needing special molded or printed parts for a keyboard housing while still providing enough rigidity, I decided on a design that would sandwich aluminum bars between the switch PCB and a top plate (bezel) around the keys.

 Initial PCB design
Another issue with a CoCo drop in keyboard is how to go about the connection to the motherboard. This I accomplished with a thin (.6mm) PCB for the main board connector and a ribbon cable. Receiving the PCBs back for the fabricator for all this, I proceeded to assemble a prototype.


PCBs for prototype keyboard

Switches installed
The keyboard is modeled after the original CoCo3 keyboard, shown with the prototype in the picture below.

Prototype with original CoCo3 keyboard
First test, CoCo MECH keyboard
Next I installed the aluminum frame, drilling and tapping the rails to fit the PCBs. I assembled this prototype in a hurry with hand tools. Things will be more precise in actual production, but still, this went well.


Prototype with frame installed

Prototype installed in a CoCo3

Installed in an ‘F’ board CoCo 1
I made some changes and produced a 2nd revision of the board which I’ll order to continue development with. This project has gone extremely well so far and I don’t see any issues in further refining it into a great drop in keyboard option for our CoCos!

REV02 design, main PCB
After receiving back REV02 PCBs, I built a prototype using that board. And experimented with different colored keys in the set, similar to how the original Color Computer 3 keyboard looked.

CoCo3 style key colors – REV02

Keyboard to main board connection

With the keys marked
Moving along towards actually producing these, I started looking for something a bit easier to manufacture for the various parts of of the keyboard (outside the PCB and keyswitches themselves) and have decided to use 3d printing to produce plastic parts to fill this role (printed in PETG).
To be able to do this I acquired a large format printer, a Creality CR-10 S5, which has a 500x500mm print bed, giving me the width to do keyboard parts.

Creality CR-10 S5, printing keyboard parts

Keyboard parts set
After designing the plastic parts for the keyboard, including a support for CoCo2 machines, I printed out a set and assembled a unit. This results in a very nice keyboard which is very stable and pleasant to use once installed and the CoCo case is buttoned up.


Keyboard installed in an American CoCo2
I’ll probably also be adding (as an option at least) a vinyl layer on the keyboard top plate for those that don’t want to see the pattern left in the plastic by 3d printing.


Vinyl sheet added to top plate
After working with the support system for a while, it became apparent that different supports would be needed for pretty much every case style. Below is a video showing installation in a CoCo3 with the supports I devised for that machine.
Installing in a CoCo3
…more to come…
Looks fantastic!!! Great job so far.
That’s really something to hope for!
In theory, it would be possible to arrange things in a different layout for non-QWERTY users, I imagine. It seems like it would need a different PCB altogether though.
That’s something of a pipe dream of mine, since I’m not a QWERTY typist and working on the CoCo is always really slow compared to my normal typing speed.
A very nice replacement for the Coco keyboard. I hope this project makes it to production.
I’ll have one . Can’t wait for them to be released
I’m definitely up for a couple of these as soon as they are ready Ed. Love your work!
Thanks David! 🙂
Nice work. I haven’t seen anything this high quality in decades, and even then it didn’t have the additional Coco3 keys.
Yes please, looks fantastic!
Will these work in Australian CoCo 1s (PAL, 240V)? And are you able to post any info about the keycap profiles for the various keyboard rows?
Electrically, yes. Some early CoCo1’s before they started using the mylar connector may need an adapter. Proper supports may be different, but that might be something that can be determined from pictures.
They are OEM profile, R1 through R4 where you’d expect them, except for the enter key being an R4 due to availability of that size key (and profile). F1 & F2 are R4’s as well.
Impressive work, as always. I just saw this discussed on CoCoTalk. Curtis wondered if we could hack in a switch to reroute the layout to swap ALT/CTRL with UP/DOWN so it would have the layout of the CoCo 1/2 for all those keyboard games. Neat stuff. Hope to get one for use with FPGA/emulators.
This looks lovely! I hope I’ll be able to get one for my CoCo 3 someday. I thought about doing this a few years ago and started doing some preliminary planning, but then I got distracted by a squirrel as usual. Congratulations on going all the way!
Thanks Mark.
It was a little bit longer road than I thought it would be, but I’m glad I did it. They turned out pretty nice. 🙂
If you ever decide to do another run of these keyboards, I’d be interested in purchasing one.
Those things are fantastic.